
A repository of photographs of leadlight in homes in the Inner Western Suburbs of Sydney.

Making Leadlight
Leadlight is made by assembling pieces of glass in a lead frame that is then soldered together Putty is then squeezed into the space between the lead and the glass to hold it firmly in place and to waterproof it.
The Glass
The glass used in leadlight windows is generally between 2-5mm thick and can be clear or coloured, smooth, textured or highly textured. Coloured glass is made by adding metallic oxides to melted glass. Copper oxides create green colours, iron can create a range of red colours and cobalt creates a range of blues. Mixing these oxides in the glass produces a great range of colours. The two main types of glass are ‘antique’ and ‘cathedral and it is reassuring that there is so much of both types still available.
ANTIQUE GLASS
The term ‘antique glass’ refers to glass that is ‘mouth blown’ and this manufacturing technique is quite old and hence the name ‘antique’. This involves picking up a blob of molten glass melted in a furnace on the end of a hollow tube. A glassblower then blows the glass into a long cylindrical shape and to do this required a great deal of skill. The top and bottom of the molten cylinder are cut off and then it is sliced down the side and opened out to form a flat sheet. The sheet can then be flattened out and even rolled. Antique glass is usually transparent but, because of the way it is made, sheets of antique glass are never the same.
CATHEDRAL GLASS
Cathedral glass is made by passing semi-molten glass through rollers. This creates a uniform texture on one side of the glass and an even thickness. Countless patterns were made on rollers to produce a huge variety of textures in cathedral glass. Cathedral glass can be as colourful as antique glass. In the Art Deco period, some of the manufactured cathedral glass had really deep ribbed patterns and this style of glass became a feature of Art Deco homes in the late 1920’s and into the 1930’s. The Abergeldie Estate in Dulwich Hill has some wonderful examples of heavily ribbed clear glass.
FANCY GLASS
Occasionally, ‘rondels’ or ‘bullseyes’, ‘teardrops and cylinder bottoms’ were created and used in leadlight designs. They were made in a variety of shapes and sizes and were used in Victorian period leadlight windows, door panels and sidelights.
Bevelled glass was frequently used in designs particularly in the Art Deco period but bevelled glass began to be used before 1900. The glass is generally thicker and an angled or bevelled edge is machined into the piece and then highly polished. The bevelled edge worked like a prism to scatter a rainbow of sparkling light through a room. These bevelled glass pieces were often in standard shapes such as circles, squares and diamonds and were purchased from glass suppliers. From about the end of World War 1 many leadlight makers must have been making bevelled glass to fit in with individual designs because the size and shapes changed quite dramatically.
Domed or 'convex' glass shapes were initially made to fit circular, oval, square and even rectangular designs and some of these convex pieces created impressive effects. Some convex glass appeared as early as the 1880’s. These convex pieces were made by placing a piece of clear glass over a concave mould which was then placed in a kiln so that the glass would slump into the shape of the mould. While these convex pieces were initially standard they became increasingly more complex and idiosyncratic in the 1920’s.
The Lead
Leadlights are created using small sections of glass held together with strips of H or U shaped lead known as ‘cames’. Most of the glass used in domestic windows is approximately 3mm thick and the channels in the lead have to not only accommodate the glass but also the putty that is forced in after soldering. In many lead lights there are usually two or three different sizes of lead came. The borders are quite wide (10-13mm) while the lead in the main section is smaller, usually between 4-6mm. To add effect or to emphasise a design element some artisans would use wider lead cames. Late Victorian and Federation designs often used different sized lead to emphasise the design.
One problem for the inner western suburbs of Sydney was that the level of pollution and the type of pollution have adversely affected the lead in these windows. One of the lovely things I have observed is that some people have realised that the lead has corroded/decayed but the glass is intact and they have had their precious and beautiful windows carefully 'releaded'. It can be a bit expensive but it is well worth it. It is certainly nowhere near as expensive as having reproductions made because the glass is intact and already in the shape needed.
Making Leadlight Panels
Leadlight windows are made to fit into a specific shape. Once the shape and dimensions of a window, door, round or square opening were known, the artist would then create a pattern or cartoon specifically for that frame and which reflected the aesthetic of the period. This explains why so much of the leadlight in the inner west is unique. It is rare to see two adjacent houses with the same patterns in their leadlight (but it does happen). What I have noticed is that the same designs reappear in neighbouring streets or suburbs. Once the cartoon is created each piece of glass is individually cut to fit into the shape on the cartoon.
When the glass is cut the lead cames are cut to both separate and hold the glass together and the panel is slowly assembled. When all the lead is in place, the joins are cleaned and soldered together. The panel is then carefully turned over and all the joints are soldered again. The glass is still loose so black putty has to be pushed into the small gap between the glass and the lead. Surplus putty is then brushed off and after a few days the putty becomes hard and waterproof. The panel can then be blackened or left to age and then cleaned prior to installation. It is a time consuming process but the product of all the effort is a beautiful piece of leadlight.
Restoration
If you have some wonderful leadlight windows that are getting a bit loose they can be easily restored through the application of new putty and a good clean.
Broken glass pieces are a little more difficult to repair but it is possible and there are some excellent leadlight restorers in the inner west who may be able to bring windows and door panels back to their former glory for a lot less than might be thought.
You can!
I encourage anyone who is even remotely interested in making or restoring leadlight windows to enrol in a course. There are quite a few people running courses in the inner west of Sydney (and in Melbourne and even Brisbane :)). Making leadlight requires a few tools, some space, and, a bit of an obsessive compulsive personality together with patience. It is labour intensive but the joy of finishing a leadlight panel and holding it up to the light is incomparable.
One of the reasons I have embarked on this site is to provide a catalogue of 'real' pieces of leadlight 'in situ'. This helps get the feel of a piece rather than a design in a catalogue. Catalogue and design books help but photos of the real thing can give a sense of proportion, design and colour that can't quite be demonstrated in a catalogue.

Vivid blue Cathedral Glass

Antique Glass. Two colours of glass mixed when molten then blown.

Cathedral Glass textured almost like 'bubble wrap' in the 1920's. The rollers used to make this are no longer available.

A glass rondel used in a typical Victorian door panel. c 1890.

A gift for a friend... One of my own efforts in leadlight. Venice...
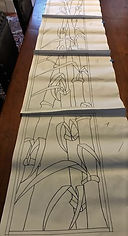

A cartoon is drawn to fit the frame. This one is part of a larger four panel set for the sidelights next to my daughter's front door.


Each piece of glass is individually cut to fit inside the lines of the cartoon. All the pieces can then be checked to see how they fit.


The cartoon is then placed in a frame. The tools above, a lead cutting knife and cutters, are used to cut the lead came to fit.

The border or edge lead is placed in the frame over the cartoon and the glass placed in its appropriate place. The lead came is cut to fit as accurately as possible. Horseshoe nails are used to hold the lead and glass in place through the assembly process. Once all is is assembled it is ready for soldering.


The finished panels in situ!

